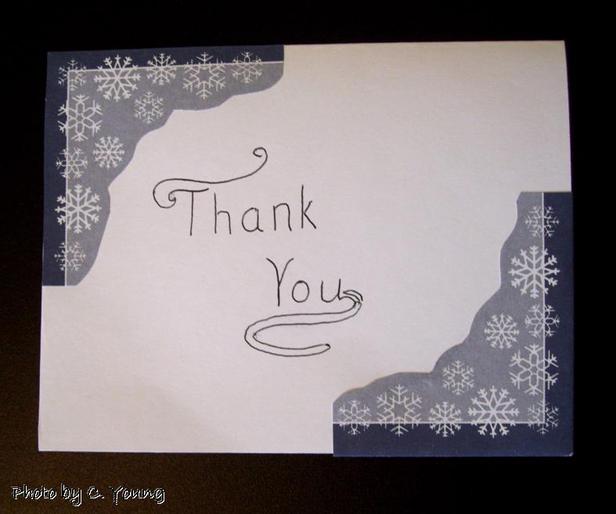
Sometimes pretty cards come with pretty envelopes. Instead of throwing away the envelopes, here is a way to recycle them into some nice homemade cards. For the card in the above picture, I cut the corners from an envelope and glued them to the corners of the card. Very simple, but it came out pretty!
0 Comments
Hey, y'all! Happy, sunshiney Wednesday morning! I haven't posted for a little while because of technical problems. But I think those are resolved, at least for now.
My sister and I had fun entering things at the fair. I entered 11 things and won $13.00. My sister entered 6 things and won $24.00. I guess you know who has the talent. :-) The judge at the fair said my decoupage "Thankful" jar would have won a ribbon except for one thing. Can you find the mistake? We've been drinking lots of bottled water lately and are having a hard time disposing of so many jugs. It seemed like there must be some crafts that can be made from them. I tried making a fall decoration for my wall and this is what I came up with. I used a utility knife and scissors to cut the bottle. After cutting the shape I wanted, I applied yellow gold Mod Podge (recipe below) as a semi transparent "paint." A hot glue gun came in handy for applying the yarn, beads, and sequins. To mount the finished product on the wall, I just used a little plasty tack. Here it is! Yellow Gold Mod Podge
Mix: 3 Tbsp. Mod Podge (glossy or matte; I like glossy) 5 drops yellow food coloring 1 tsp. gold glitter acrylic craft paint To use, apply to the item you want to paint with brush or sponge and then was brush or sponge immediately in hot water and soap. Dish soap gets it out more easily. Can you paint with sugar? This man can. Looks fun. I might like to learn how to do it sometime. I've had fun making some more lemon candles. Each one is different because each lemon is a slightly different size and shape. Also, as the lemons dry, they tend to change shape a bit. These are great to use in the kitchen, or to give away to friends who like unique gifts. Here is how to make them: Materials: Birthday candles (can be used) Lemons Old sauce pan (not used for food) Old tin can (to use as double boiler in sauce pan) -- Make sure the label is completely removed from your can. Wax of whatever color you like (can be melted wax from other candles) Old knife (not used for food) to control wax when pouring into lemon First lay out all your supplies. Then slice your lemon(s) in half. Squeeze the juice out of the lemon to use for lemonade, baking, or whatever else you like. Then carefully pull all the membrane out of the lemon. If a little waxy part sticks up in the center of the lemon, trim it off. Now place a little water in the bottom of the pan. Not too much because you don't want the can inside the pan to tip over. Put some wax of your preferred color in the tin can. Place the can inside the water inside the old sauce pan. Turn burner on medium. Heat until wax is completely melted. If you are using old wax from "recycled" candles, any debris (such as pieces of wick from the old candle) will settle to the bottom of the wax as it melts. While wax is melting, measure the height of your wick by placing a birthday candle inside the lemon peel. Measure from the top of the candle. Be careful not to break the wick. Trim the candle to the right height -- trim the bottom of the candle. You don't want to cut off the wick. Set lemon peels on a hard, heat resistant surface. Pour in melted wax, directing the stream with the edge of your knife if necessary. Take care not to let the lemon skin tip over. If you are using "recycled" wax, take care not to pour all of the wax in or you may get some debris in your new candles. Allow wax to cool slightly. Place birthday candle in center of wax and press into the bottom of the lemon peel. Hold for a couple of seconds. Be careful not to burn your hands on the hot wax. Allow the colored wax to cool completely. If the birthday candle is too tall, burn it down so that the top of it is about level with the top of the colored wax. Do this after the colored wax has cooled. Allow the melted wax from the birthday candle to cool. Trim the wick of the birthday candle so that it is not too high. Peel the melted wax from the birthday candle off the top of the colored wax. It should peel off easily. This will make the candles look better. Now your candles are ready to light and use or to give away to a friend. Enjoy! :-) One thing that has intrigued me lately is the possibility of making a candle out of ordinary kitchen items - olive oil and an orange. Here is a video that shows how. This man used a clementine for his candle, but I think any kind of orange will work. Note: It may be easier to light the "wick" of the candle with a lighter such as you would use for your gas stove or grill since it takes about 20 seconds for the wick to light. You will notice that the match burns down quite close to the guy's fingers. Someone wondered if it were possible to use a lemon instead of an orange to make the candle, so I thought I'd try it. It didn't work because the natural "wick" in a lemon is too skinny, and it melted down before it could actually light. Didn't want to waste the lemon peel, so I tried something else. On the left is the lemon peel before I tried to turn it into a candle. It has cloves sprinkled on it to give it a good smell. On the right is the improvised lemon candle. I cut out the rest of the natural "wick," poured in melted wax from other candles, and inserted a piece of birthday candle for a wick. It worked fine and smells nice. The other day I learned how to make something pretty out of something we usually throw away. Toilet paper roll flowers are easy to make. This video on youtube shows a simple tutorial of how to make them. Of course, I added my own variations. Instead of painting the outside, I took Mod Podge and used it to cover the rolls with strips of wrapping paper. Any wrapping paper will do. This is a great way to use up little pieces that are too pretty to throw away and too small to use for wrapping anything. Did you make some toilet paper roll flowers? How did they turn out? I think they look pretty stacked on top of each other. Makes a neat effect.
Did you ever make hot glue magnets? These are fun, cute, and easy to make. Here is what you will need if you want to make some. Hot glue gun (low temperature) Glue sticks Shiny little plastic hearts or heart shaped sequins Little round magnets (available at WalMart for about 92 cents) It takes about 2 glue sticks to make three magnets. To make the heart magnets, I first got out the hot glue gun and plugged it in. While it was heating, I found a napkin with little heart shaped designs imprinted on it. When the glue gun was hot, I squeezed hot glue onto the heart design on the napkin, making sure to follow the design with the glue. I allowed the glue to harden slightly and then put shiny plastic hearts in the center of the heart shaped glue blob. Another layer of glue was added on top of the shiny hearts. This was then allowed to cool completely. Once the glue was cooled, as much napkin as possible was peeled off the back of the hardened glue shape. Then I took scissors and trimmed around the edge to make the heart look neat and to remove the rest of the napkin. Finally I added a magnet to the back. There it was - the finished product! ----------------------------------------------------------------------------------------------------------------------------- I also made shell magnets. Well, one was made with a heart bead, but the other two were made with shells. These were made similarly to the heart ones. Placing the glue was a little simpler, however. I just squeezed a layer of hot glue in a circle shape onto some waxed paper. This was allowed to cool slightly, and then the bead and the shells were pressed into the soft glue. After this, another layer of hot glue was applied around the bead and shells but not on top of them. When the glue had cooled completely, I peeled as much waxed paper off as possible and neatly trimmed around the edges with scissors. Lastly, I applied the magnet to the back, and there I had it! So much fun! I hope you try it and have fun too. :-) |
Archives
August 2022
Categories
All
Ways to Earn and Save
Try ShopAtHome for cashback when you shop. Visit the site for more info.
Southern Savers is a great place to keep up to date on coupons and deals.
Join Swagbucks and earn money for searching the internet, answering a Swag poll, and doing other fun things each day.
This video by Gospel for Asia about Christmas has a message that reaches right into the heart and makes us think. |